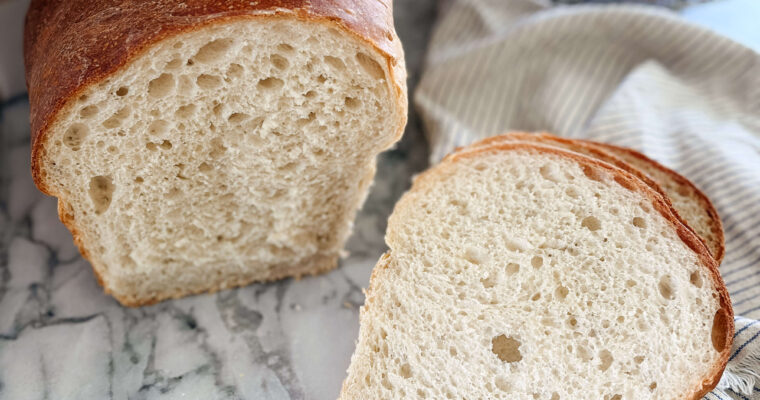
;

Author: abbeyverigin

Rhubarb Vanilla Bean Jam

Rhubarb Vanilla Bean Jam

This rhubarb vanilla bean jam is the perfect canning project for early in the garden season. Rhubarb vanilla bean jam is a low sugar jam recipe with no pectin required. Canning is something I like to do year round, but there’s something special about the…

Cottage Cheese Egg Bites

Cottage Cheese Egg Bites

Light and fluffy and packed with protein, these cottage cheese egg bites are a meal prep staple.

Savory Breakfast Muffins

Savory Breakfast Muffins

Savory breakfast muffins are the perfect make ahead, grab and go breakfast for busy mornings. These muffins are packed full of protein, fiber and whole food ingredients to start the day right.

For most of us, mornings are busy and I find spending the time to do a bit of meal prep each week really helps me guarantee that I get in a nutritious meal at the start of my day. Muffins are convenient because they are portable, but most recipes are sugar filled and low in protein. I created these muffins to fill my need of a grab and go breakfast or snack option that is freezer friendly, while also packing in plenty of protein and fiber. I use cottage cheese, sausage and eggs to up the protein in my savory breakfast muffins, and plenty of vegetables, oat flour and a bit of ground flax for fiber.

What I love about these muffins is that they are super versatile. Don’t need them to be gluten free? Use a different flour. Don’t have the called for veggies? Substitute what you have! Every rendition of these muffins that I make is slightly different and all of them turn out great.

Ingredients & Substitutions

Eggs. Acts as a binder and adds 28 grams of protein to the recipe. I would not recommend substituting egg replacer in this recipe.

Cottage Cheese. Adds moisture and protein to the savory breakfast muffins. Greek yogurt can be substituted in equal amounts.

Milk. Adds moisture. Dairy free milk alternatives like almond and coconut milk work as well.

Butter. Provides flavor, moisture and healthy fats. Olive oil, avocado oil or melted coconut oil can all be used in equal amounts.

Honey. Adds just a touch of sweetness and depth to the muffin batter.

Salt. A necessity to enhance flavor.

Pepper. Adds a touch of spice. Chili flakes or paprika can also be added based on your preference.

Garlic Powder. A necessity to any savory recipe, but onion powder can also be used.

Baking Powder. Acts as a leavening agent to make the muffins light and fluffy.

Ground Flaxseed. I like to add ground flax to help with binding and increase the fiber content just a bit. Ground chia seeds could be used in equal amounts, or you can omit.

Oat Flour. Oat flour is my go to for gluten free baking. Gluten free all purpose flour, regular all purpose flour and whole wheat flour all work in this recipe.

Sausage. Cooked sausage is my favorite in this recipe, but any meat could be used here. Bacon, ham or ground turkey – whatever works!

Peppers. I love diced peppers in this recipe, but any veggie can be substituted. I use whatever needs to be used up in my fridge. If I use carrots or zucchini, I prefer to use shredded. Firmer veggies like broccoli or cauliflower I recommend roasting first.

Spinach. I like to include some greens. Kale also works great.

Green Onion. I love to include green onions or another fresh herb in this recipe. Diced red, white or yellow onion also work.

Cheese. While not a necessity, adds plenty of flavor, healthy fats and some protein. I usually use cheddar, but feta is also delicious.

Flavor Combinations

These muffins are so versatile, and every batch I make is a little different. These are some of my favorite flavor combinations.

Spinach, Sun-dried Tomato & Feta Cheese. Use 2 1/4 cups chopped spinach, 1/2 cup chopped sun-dried tomatoes, 1/2 cup chopped green onion and substitute feta cheese in place of the cheddar cheese. I like to use ground turkey for the meat portion in this recipe.

Ham, Broccoli & Cheddar Cheese. Use diced ham in place of the sausage and substitute the spinach and peppers with cooked, chopped broccoli.

How To Make Savory Breakfast Muffins

Preheat oven to 375.

To a large bowl, add eggs, cottage cheese, milk, melted butter and honey then whisk together.

Add salt, black pepper, garlic powder, baking powder, ground flaxseed and whisk again.

Stir in oat flour.

Add sausage, vegetables, cheese and stir again.

Line a muffin tray with liners or grease well and evenly divide muffin batter, makes 18.

Bake 25-30 minutes until lightly golden brown. I store the muffins in the fridge for up to 5 days, or in the freezer up to 3 months.

Tools

Cast Iron Muffin Pans

Muffin Scoop

Muffin Liners

Yield: 18

Savory Breakfast Muffins

Savory Breakfast Muffins

Savory breakfast muffins are the perfect make ahead, grab and go breakfast for busy mornings. These muffins are packed full of protein, fiber and whole food ingredients to start the day right.

Prep Time 15 minutes
Cook Time 30 minutes
Total Time 45 minutes

Ingredients

  • 4 eggs
  • 1 cup cottage cheese or greek yogurt
  • 1/4 cup milk
  • 3 tbsp butter, melted
  • 3 tbsp honey
  • 3/4 tsp salt
  • 1/2 tsp black pepper
  • 1 tsp garlic powder
  • 1 tbsp baking powder
  • 2 tbsp ground flaxseed
  • 2 cups oat flour
  • 1 lb ground sausage, cooked
  • 1/2 cup green onion, chopped
  • 1 1/2 cup spinach, chopped
  • 1 1/4 cup bell pepper, diced
  • 1 cup shredded cheddar cheese

Instructions

  1. Preheat the oven to 375.
  2. In a large bowl, whisk together eggs, cottage cheese, milk, melted butter and honey.
  3. Add salt, black pepper, garlic powder, baking powder and ground flaxseed then whisk again.
  4. Stir in oat flour.
  5. Fold in sausage, vegetables and cheese.
  6. Line or grease a muffin tray. Divide the batter evenly into 18 muffins.
  7. Bake for 25-30 minutes until golden.
  8. Cool completely, then store in an airtight container in the fridge for up to 5 days or in the freezer for up to 3 months.

Notes

Any meat can be substituted in place of the ground sausage, just be sure to use cooked.

Gluten free all purpose flour, regular all purpose flour, or whole wheat flour can be used. If using one of these alternatives, use 1 3/4 cups.

Cottage cheese can be substituted with greek yogurt in an equal amount.

Any veggies can be used in place of those called for. I do recommend keeping the green onion in this recipe as they add flavor, but regular onion can be substituted in place of them.

More Breakfast Recipes

Breakfast Biscuits

Pin It For Later

savory breakfast muffins Pinterest graphic
Gluten Free Berry Muffins

Gluten Free Berry Muffins

These berry muffins are naturally gluten free and high fiber made with oat flour. Lightly sweetened with maple syrup and with added greek yogurt, these healthy muffins are refined sugar free and higher in protein.

Best Refined Sugar Free Granola

Best Refined Sugar Free Granola

This homemade refined sugar free granola is packed with rolled oats, coconut and almonds for fibre and healthy fats, and lightly sweetened with honey or maple syrup.

Home Canned Chicken Taco Soup Recipe

Home Canned Chicken Taco Soup Recipe

This home canned chicken taco soup is an easy pressure canning recipe to stock the pantry with. Packed with veggies, beans, chicken and broth this is the perfect shelf stable meal in a jar recipe to have on hand.

pint jars of home canned taco soup on cream antique hutch

Soups have become one of my favorite things to have on the pantry shelf. They are cheap to make, hearty, and the perfect shelf stable meal in a jar. I have been canning up plenty of soup outside of preserving season and it is so convenient to have on hand for when I haven’t prepared ahead.

This chicken taco soup is packed full of protein from our homegrown chicken and black beans, and filled with veggies like tomatoes, onions, pepper, corn and garlic. Just open a jar, dump it in a pot, heat and serve for a quick and easy meal with a much cleaner ingredient list than store bought options. I love this soup topped with a big of shredded cheese, greek yogurt or sour cream, and fresh or pickled onions.

Is It Safe To Can Chicken Taco Soup

It is safe to can soup at home if it is pressure canned as soups contain low acid ingredients. Soup should not be water bath canned. Be sure to avoid including ingredients like dairy, thickeners, flour and grains which are not considered safe for pressure canning.

There are guidelines for canning your own soup recipes. They call for a shorter processing time and filling the canning jars no more than half way with solids. This recipe calls for the full length processing time for meat and beans with this soup recipe as I fill the jars more than half way with solids.

How Long Does Home Canned Soup Last

For best flavor, consume home canned soup within a year of canning, however it is safe to consume beyond this with a good seal.

Ingredients Needed For Chicken Taco Soup

Chicken. You can use partially cooked or raw chicken. I typically use partially cooked chicken that I have shredded. We raise our own meat and I find it faster and less effort to partially cook a whole chicken versus using breasts from a parted chicken.

Black Beans. Use dried black beans that have been soaked. It’s important that beans be simmered or long soaked prior to canning.

Tomatoes. I used some of our home canned diced tomatoes, but feel free to use fresh.

Onion. White, yellow or red onion work.

Corn Kernels. Fresh or frozen can be used. If frozen, be sure to thaw prior to adding to your canning jars.

Peppers. I used some of our frozen peppers I had diced from the garden and thawed before adding to my canning jars.

Garlic. No soup is complete without garlic – I use a clove per pint.

Salt. Essential to enhance the flavor.

Black Pepper. Feel free to reduce the amount based on preference.

Chili Powder. If using a store bought chili powder, be sure to check the ingredients to make sure they are safe for canning.

Broth. I use homemade chicken broth. I do not salt my broth, if using salted broth I would recommend reducing the amount of salt called for in this recipe.

Tools Needed For Pressure Canning Soup

Presto 23 Quart Pressure Canner

Pressure Canning Rack

Jar Lifter

Canning Lids Use code ABBEY10 to save 10%

pint jars of home canned chicken taco soup on cream antique hutch

How To Pressure Can Chicken Taco Soup

12 hours before canning, add dried black beans to a bowl and cover completely with water. Alternatively, the quick soak method can be used.

Clean canning jars, lids and rings.

To each jar, add soaked black beans, chicken, diced tomatoes, diced onion, corn kernels, diced peppers, minced garlic, salt, black pepper, and chili powder.

Fill jars to 1 inch of headspace with chicken broth.

Use a chopstick or debubbling tool to remove bubbles. Adjust headspace as needed.

Clean the rims of canning jars well with a cloth or paper towel and white vinegar.

Apply lids and rings to fingertip tight.

Add water to the pressure canner per the manual, my presto 23 quart requires 3 quarts of water.

Place a canning rack at the bottom of the pressure canner and add jars.

Close lid and begin to heat the canner. When a steady stream of steam is coming out of the vent pipe, allow the canner to vent 10 minutes.

Add the regulator after venting and bring the canner up to pressure. Using a dial gauge pressure canner, process at 11 pounds of pressure if below 1000 feet elevation. Using a weighted gauge pressure canner, process at 10 pounds of pressure if below 1000 feet elevation. Adjust as needed based on elevation.

For pints, process jars for 75 minutes. If using quarts, process jars for 90 minutes.

Once the processing time is up, turn off heat and allow the pressure to come down to zero.

Crack the lid for 5 minutes, then remove the lid and allow the jars to continue cooling in the canner an additional 5 minutes. This will slow down the cooling process and help to prevent siphoning.

Allow jars to cool overnight on the counter. Remove rings, clean jars and label before storing.

Yield: 14 pints

Home Canned Chicken Taco Soup

pint jars of home canned chicken soup on antique cream colored hutch

This home canned chicken taco soup is an easy pressure canning recipe to stock the pantry with. Packed with veggies, beans, chicken and broth this is the perfect shelf stable meal in a jar recipe to have on hand.

Prep Time 15 minutes
Additional Time 1 hour 15 minutes
Total Time 1 hour 30 minutes

Ingredients

  • 1/2 lb (approx 1 cup) dried black beans
  • 1 1/2 lbs partially cooked or raw chicken, shredded or cubed
  • 14 cups chicken broth
  • 3 1/2 cups tomatoes, diced
  • 4 cups onion, diced
  • 3 cups corn kernels
  • 1 3/4 cups bell peppers, diced
  • 14 cloves garlic, minced
  • 7 tsp salt
  • 3 1/2 tsp ground black pepper
  • 7 tsp chili powder

Instructions

  1. Cover dried black beans with water and soak 12 hours. Alternatively, use the quick soak method and add dried black beans to a pot and cover with 2 inches of water. Boil 2 minutes, cover and allow to sit for 1 hour.
  2. Drain and rinse black beans.
  3. Prepare canning jars, lids and rings.
  4. To each pint jar, add 3 tbsp soaked black beans, 1/2 cup chicken, 1/4 cup diced tomatoes, 1/3 cup diced onion, 1/4 cup corn kernels, 2 tbsp diced pepper, 1 clove minced garlic, 1/2 tsp salt, 1/4 tsp black pepper, and 1/2 tsp chili powder.
  5. Top jars with broth to 1 inch head space. Debubble jars, adjust headspace, clean rims and add lids and rings to finger tip tight.
  6. Fill pressure canner with water per manual, matching the water temperature to the jars. Add canning rack and jars.
  7. Close lid, heat canner, and allow the canner to vent 10 minutes once a steady stream of steam is visible.
  8. Add regulator or weight and bring canner up to pressure. Process at 11 pounds of pressure if using a dial gauge pressure canner, or 10 pounds of pressure if using a weighted gauge pressure canner, adjusting if above 1000 feet elevation.
  9. Process 75 minutes.
  10. After processing time is up, turn off heat and allow canner to come down from pressure completely. Crack lid for 5 minutes, and remove lid for an additional 5 minutes before removing jar from canner to prevent siphoning.
  11. Allow jars to cool on the counter overnight. Check seals, remove rings and clean jars before labelling for storage.

Notes

For quarts, to each jar add 6 tbsp soaked black beans, 1 cup chicken, 1/2 cup diced tomatoes, 2/3 cup diced onion, 1/2 cup corn kernels, 1/4 cup diced pepper, 2 cloves minced garlic, 1 tsp salt, 1/2 tsp black pepper, and 1 tsp chili powder. Process 90 minutes.

Similar Posts You Might Like

Home Canned Beef & Vegetable Soup

Home Canned Zuppa Toscana

Pin It For Later

home canned chicken taco soup Pinterest graphic
Best Gluten Free Focaccia Bread

Best Gluten Free Focaccia Bread

This gluten free focaccia bread is soft and chewy with a perfectly crisp crust. Easy to make customizable, and delicious dipped in olive oil and balsamic vinegar or used as a gluten free sandwich bread alternative.

Overnight Oatmeal Pancakes

Overnight Oatmeal Pancakes

Overnight oatmeal pancakes are a simple soaked pancake recipe for easy digestion. Higher in protein and fibre, these make for a hearty make ahead breakfast option.

Blackberry Jam Without Pectin | How To Can Jam

Blackberry Jam Without Pectin | How To Can Jam

Fresh homegrown blackberries are one of the best parts of summer, and homemade jam is the perfect way to preserve their flavor to enjoy throughout the cooler months.

jars of home canned seedless blackberry jam on marble slab with antique spoon of jam and open jar

Come August, we are swimming in blackberries. They grow in abundance here on our property and I am always looking for new ways to preserve them. Freezing for winter smoothies and desserts along with water bath canning homemade jam are some of my favorite ways to use them up.

Blackberries are naturally high in pectin, so they are a great jam to make without additional store bought pectin. Most jam recipes use equal parts fruit and sugar, and in my opinion the result is an overly sweet jam. Any time I can jam I use low sugar recipes. All you need to make homemade blackberry jam is blackberries, some sugar, and I like to add in some fresh lemon juice to brighten the flavor.

We have both seedless and rather seedy blackberries here on our property and this jam recipe works with both. If I am using particularly seedy blackberries I like to process through a food mill or push through a fine mesh strainer for a smoother result.

How To Make Blackberry Jam Without Pectin

Add blackberries to a heavy bottom pot with sugar. Stir together and, optionally, allow to macerate for an hour until the sugar begins to dissolve.

homegrown blackberries and sugar in a dutch oven

Heat the blackberries and sugar over medium until the mixture begins to simmer, the blackberries start to breakdown and the sugar is fully dissolved.

To make a seedless blackberry jam, push the mixture through a fine mesh strainer or food mill to remove the seeds. Make sure to remove all of the pulp and juice, then transfer the mixture back to the pot.

Continue to simmer the jam over medium low for about 15 minutes, or until the jam has reached the gel stage. This can be tested by spooning a small amount of jam onto a cold plate. If it sets to a jam like gel texture, it is ready to jar up. If it doesn’t, continue simmering. A temperature of 220 F (104 C) is considered the gel stage, so this can also be confirmed with a food thermometer.

Ladle the jam into clean, hot 1/2 pint sized canning jars to 1/4 inch of headspace. Remove any air bubbles, clean the rims, and apply lids and rings to finger tip tight.

Transfer jars to a canning pot with a rack at the bottom. Make sure the water is fully covering the jars by 1-2 inches. Cover the pot and bring up to a boil. Once boiling, process for 10 minutes, adjusting processing time as needed based on elevation.

Remove jars from canning pot and allow to set at room temperature overnight. Remove rings, confirm jars sealed, clean and label. Home canned jam will last for years with a good seal, for best quality consume within 1 year.

close up shot of 3 jars of home canned blackberry jam and one jar of opened jam on marble surface

Is It Safe To Can Jam At Home

Yes! Jam contains two high acid ingredients – fruit or berries and sugar. Blackberries actually do not need any additional sugar and can be water bath canned at home in just water. If you are new to canning you can test the PH of your home canned items with PH strips for peace of mind. A PH of below 4.6 is safe for water bath canning.

This recipe calls for fresh lemon juice. In this case the lemon juice is for flavor, not for safety so fresh can be used.

Tools & Ingredients Needed For Blackberry Jam

Dutch Oven

Fine Mesh Strainer

Food Mill

Canning Lids & Rings (Save 10% with code ABBEY10)

Water Bath Canner

Best Jar Lifter

Yield: 4-5 half pint jars

Blackberry Jam Without Pectin

3 half pint jars of home canned blackberry jam on marble surface with open jar of jam and spoon of jam

Homemade blackberry jam is simple to make without pectin and the perfect way to enjoy blackberry flavor throughout the cooler months.

Ingredients

  • 12 cups fresh or frozen blackberries
  • 2 1/2 cups cane sugar
  • 1/4 cup fresh lemon juice

Instructions

    1. Add blackberries and sugar to a large pot and allow to macerate. This is optional but speeds up the cooking process.

    2. Add lemon juice and heat over medium until berries have softened.

    3. To make seedless jam, press through a fine mesh strainer or food mill.

    4. Add berry mixture back to the pot and bring to a low boil, then simmer for 15-20 minutes until jam gels. This is at a temperature of 220 F or when a small amount spooned onto a cold plate gels up.

    5. Fill 1/2 pint jars to 1/4 inch headspace. Clean rims, apply lids and rings to finger tip tight. Process in a waterbath canner for 10 minutes, adjusting as needed based on elevation.

More Canning Recipes

The Best Home Canned Ketchup

Home Canned Zuppa Toscana

Home Canned Beef & Vegetable Soup

Pin It For Later

Home Canned Zuppa Toscana Recipe

Home Canned Zuppa Toscana Recipe

Zuppa Toscana is a comforting soup filled with pork sausage, potatoes and kale for a hearty and delicious meal, and with a couple adjustments it can be pressure canned at home for a quick and easy shelf stable meal. Winter weather means lots of soups…


Privacy Policy